Espresso Machine Down -- ((( Vibes )) for IL Primo...

Full Name:
Sycamore Slough
Forums:
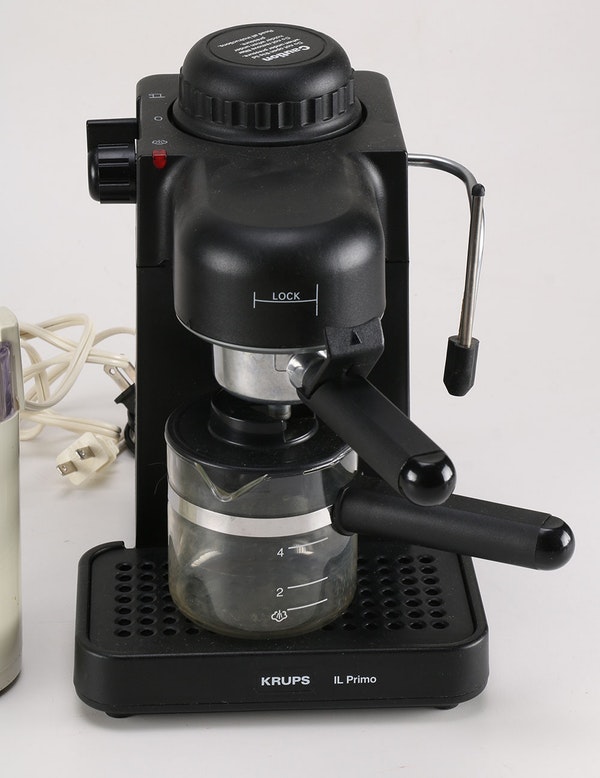
Looks just like this one, except no original Carafe. Otherwise, all "Stock". (The Carafe is easily broken.)
- Log in to post comments
Looks just like this one, except no original Carafe. Otherwise, all "Stock". (The Carafe is easily broken.)
Top of Page Bottom of Page PermalinkFull Name: Imagine
Sorry to hear it, Stu. May it
Sorry to hear it, Stu. May it rest in pieces.
Got plans for a new one?
Top of Page Bottom of Page PermalinkFull Name: Sycamore Slough
So from what I can figure,
So from what I can figure, it's the switch that's "On the Fritz" after so many thousand cycles. Highlighted below :::
The blackish circle at upper left is not part of the appliance, just a graphic to indicate the switch mechanism.
It's a simple, yet brilliant design. Three settings. You flip it to "Steam" and the water inside heats up, and then steam comes out of the metal tube on the right. So you can froth or steam your dairy or Almond milk.
The middle is 'Off".
The other setting is "Espresso". You can let the heated water flow through the filter basket full of ground coffee powder, which makes the Magical Elixir that Humanity desires.
Top of Page Bottom of Page PermalinkFull Name: Sycamore Slough
I tried to zoom in a little
I tried to zoom in a little there. The icon nearest the top is a little cup; the one below ( 0 ) is "off" and the bottom one represents a tiny Steam Cloud.
The red thing is a tiny lamp which goes on when the switch is activating the heater circuit (that heats the Water).
So the lamp glows when you are in "Steam" or "Espresso" position.
Top of Page Bottom of Page PermalinkFull Name: Sycamore Slough
So the fault is in the
So the fault is in the electrical contacts of the switch. After 3800 - 4200 cycles or so, the "brushes" or "stators" or whatever the Germans call them are On the Fritz / Kaput.
I did manage to barely actuate the 'Steam' setting, lil' red light went on, but not enough pressure remained to pull a decent Espresso shot.
Maybe I'll try taking it apart and see if I can actually get in there, but it looks pretty Grim. Seems like there's no seam and the pressure tank / switch assembly are molded in to the ABS plastic housing.
Top of Page Bottom of Page PermalinkFull Name: vivalavuvuzela
Every coffeemaker on earth
Every coffeemaker on earth has a thermal fuse, sometimes multiple. Pretty sure there will be a safety cutoff on the steam heating element, too. But most of those little machines and single serve devices simply are not made for hard or even consistent regular use, so I wouldn't go too crazy trying to repair it.
My money's on one of those fuses being the problem with 75% certainty. They are cheap (usually cost more to ship than the part itself) and easy to replace, but that doesn't mean a lick when you need your coffee NOW!
Top of Page Bottom of Page PermalinkFull Name: fishcane
My Chemex has no thermal fuse
My Chemex has no thermal fuse...
Top of Page Bottom of Page PermalinkFull Name: Sycamore Slough
So thank goodness I had a
So thank goodness I had a backup Krups or two.
I don't really liek that one as much, but it worked OK. Kinda dingey after sitting on some dusty shelf for ages. Maybe it's the Model 993 ??
Same basic internals as IL Primo, model 972. The wedge shape is nice, I guess.
It's sitting in a little wooden slab / box which is how I like to work on Krap that has parts and screws that fall out; that way you can find them.
Top of Page Bottom of Page PermalinkFull Name: _________
Vibes For Your Coffee Maker ?
Vibes For Your Coffee Maker ?
N
O
Top of Page Bottom of Page PermalinkFull Name: Sycamore Slough
I managed to take apart IL
I managed to take apart IL Primo and it was not all that difficult, once the Holy Elixir found its way out of the backup machine.
Looking around the IL Primo, I spotted several "Phillips Head Screws" and started there -- I started at the bottom, which is the only option.
That's what it looks like when you remove the base. You don't have to take off the little rubber countertop feet -- two screws on the bottom and one in back.
So what you see is looking into the machine with the base off. Black wire is the one you plug in to an outlet, which feeds the Red and Blue wires.
Silver thing on the right is the tiny H2O heater tank.
See how nice they wire all that together !! Made in Switzerland. This is the Model 972 -- I can't say if modern Krups are that well-built.
Top of Page Bottom of Page PermalinkFull Name: Sycamore Slough
So don't try this at Home !!
So don't try this at Home !! No user-serviceable parts etc. But if you do, you want a really long Phillips-Head screwdriver for the next step, taking the top off. Like 11" - 12" long. One would reach down in there and loosen 3 long, skinny Phillips-Head screws that attach the top to the rest of the machine.
Unscrew the lid where you put the Water in.... Take off the filter basket and "Handle".
Obviously, the knob which the arrows are pointing at slides off before the top comes off the main housing. Also you take a stubby Phillips screwdriver and unscrew the little plate where the water comes out for the filter basket -- then it all comes apart.
So that little red devil w/ the numbers was the culprit. That's the actual switch for "Heat ON" or not. Where it says '170.0' the actuator button is just left of the 'Zero'. The photo here is way Zoomed-in; red and blue hoses are actually tiny wires.
My guess is that it's like 1/10 -> 1/5 of a millimeter out of tolerance, from the ravages of Time and microscopic wear.
So I squished it in there a bit better, and put the thing back together. Working now, so that's Quaint.
If it messes up again, I'll repeat the process, but stabilize the switch with some Glue.
Top of Page Bottom of Page PermalinkFull Name: Sycamore Slough
That's all the tools needed
That's all the tools needed to take the Krups apart and put it back together. Actually, the Swiss Army knife (sorry Phillips SD got cropped) is almost enough to take the thing apart, but the longer Phillips you need to get the top off.
Then when you want to put the top back on, the needlenose pliers help you get the screws back in there, unless you have tiny hands.
Top of Page Bottom of Page PermalinkFull Name: fishcane
those pix really make me
those pix really make me appreciate my chemex!
Top of Page Bottom of Page PermalinkFull Name: skyjunk
Why dont you just get another
Top of Page Bottom of Page PermalinkFull Name: I rang a silent bell
Go Disco MacGyver!
Go Disco MacGyver!
Top of Page Bottom of Page PermalinkFull Name: Sycamore Slough
"...Why dont you just get
"...Why dont you just get another one that looks just like that first picture..."
That's a good question. I already have that white one, which does about the same thing. Plus a couple of more advanced Krups with pumps, and a snazzy Italian pump machine. They are all more advanced and expen$ive espresso makers. The Italian one even has a built-in coffee grinder (which spews Coffee dust around the counter).
Basically I like the "IL Primo" for consistency and ease of use. Difficult to find a brand-new one of that model, as they haven't sold those in 15 - 20 years. That one and several other "IL Primo" machines came from Junque Shoppes liek Goodwill, and they cost about less than a Beer at a concert. But I gave a few to friends who like Good Coffee over the years. Of course, those were in great shape with zero hours -- castaway wedding gifts ??
This one has been a reliable old Pal over the years. It's traveled to Vegas, Oakland, Big Cypress, Midwest & even Horning's Hideout, no shit. So how could I abandon my favorite Coffee appliance without trying to rehabilitate it ?
Anyway, it was worthwhile taking the darn thing apart, just to see how it's put together. Those Switzerland people do quality work.
Top of Page Bottom of Page PermalinkFull Name: treat island
This was fun, thanks, D Stu.
This was fun, thanks, D Stu. I like looking at small machine parts. When I was in the 10th grade (at Hollywood High) I took an aptitude test. I'm sure I messed with it, as was my way in those times, but the result was that I had aptitude for only one thing; fixing small machines, such as sewing machines. I like small machines, but luckily, I tried a few other things as life progressed and found I had aptitude for some other things, too.
Top of Page Bottom of Page PermalinkFull Name: Sycamore Slough
Rained the last 3-4 days here
Rained the last 3-4 days here, so fooling with an old Espresso maker was a fun indoor project.
Maybe 30-45 minutes to remove / replace the 7 or 8 screws etc.
Much longer to round up the screwdrivers and take fotos, then shrink/scale the fotos and post.
The UTubes of folks converting burnt-out water heaters into hog troughs and Solar greenhouses are very inspirational.
Top of Page Bottom of Page PermalinkFull Name: Fly
seems like youve had enough
seems like youve had enough espresso!
Top of Page Bottom of Page PermalinkFull Name: Sycamore Slough
A few days later, the
A few days later, the machine is performing fine.
Mr. Fly, I can quit any time
Actually, I just have one in the Morning. But I really enjoy having one Decent -> Fine cuppa coffee when it's that time.
So now I know how to repair the darn thing and can focus upon more intellectual projects like Sticks, Rocks, Dirt, and Gravel.
I feel blessed to have learned something.